
The Definitive Guide to Realistic High Dynamic Range Images
We have all seen them. The alien worlds. The velvet paintings. The collision of photography and flamboyant computer graphics effects.
This tutorial is none of those things.
This tutorial will attempt to demonstrate how to make a realistic HDR, one that is virtually indistinguishable from a single exposure. The biggest goal is producing a tutorial that can stand as a standard by which anyone can learn to create a balanced HDR. Ultimately, the processing choices are yours. These are the building blocks.
Before we start, some background about high dynamic range (HDR) that are often misunderstood or misconstrued. HDR is two or more exposures, and in many cases, more is not necessarily merrier. For simplicity's sake (Occam's Razor), use only the minimum number of exposures to cover the dynamic range of the scene. Today's auto-bracketing features allow for a neutral image, plus an exposure on either side of the neutral image (±1/3 stop to ±2 stops). A proper exposure on a decent digital camera covers about six stops of information; bracketing at ±2 renders approximately twelve stops of information. That is enough to cover all but the most extreme circumstances, like shooting into the sun, or interiors with wild lighting.
HDR is not a new fad in media--HDR has been used in cinematography since the days of Westerns. Any time the cowboy rides off into the [perfectly exposed] sunset where all the foreground is also perfectly exposed, that was HDR. Including artists of paint and pen, HDR techniques have been around for centuries.
Terminology with respect to HDR, while minimal, can be rather touchy. The two biggest issues are high dynamic range imaging and contrast. High dynamic range imaging is a technique to bring out the details in both light and dark extremes of an image. Contrast is more confusing. Local contrast is the contrast between adjacent components within the photo. A high local contrast will increase the perceived contrast of the entire image. A common complaint is that HDR images have less contrast than single exposures. Of course they do! The shadows and highlights are being expanded, then compressed into the same eight bit dynamic range as any other RGB image. However, with skillful processing, increasing local contrasts in the image will go a long way towards making the HDR merge amiable.
Enough rambling. On with the tutorial!
Materials
Canon 20D;
Three auto-bracketed exposures: -2 EV, ±0 EV, +2 EV;
Adobe Photoshop CS2 (Photoshop 9.0.x).
Outline and Procedure
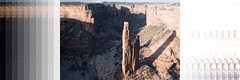
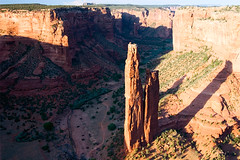
I pondered long on how best to demonstrate this technique. First, I thought that just a run-of-the-mill, step-by-step tutorial would be easiest. Then I realized that my plug-and-chug tutorial would not offer any more insight than any other plug-and-chug tutorial. So I decided that I would take the three-exposure bracketing of the Canyon de Chelly (pictured at top), and make the plus and minus two exposure value frames, respectively, look "exactly" like the perfectly-exposed middle exposure. So, basically, I am taking the -2 EV and +2 EV frames, and merging them to look like the 0 EV frame.
"But, Mr. Leviathor!", you say, "You just said that HDR images can't look like single exposures and you said that you were going to make them look 'exactly' like one another!" Well, through the magic of Photoshop, I will get it pretty darn close. Noticeable in the HDR will be extra details in the shadows, and some richening of the highlights. Spending a lot of time to make an HDR look realistic is not always required--I just had an original to "copy". Now would be a good time to mention that I used both a circular polarizer and a two-stop graduated neutral density filter. Did I need to process this as an HDR? No, and I typically would not--in fact, I would advise against it. However, this is purely for demonstration. For posterity, if I did not have a GND filter, I would have had to use HDR.
First, navigate to File > Automate > Merge to HDR.
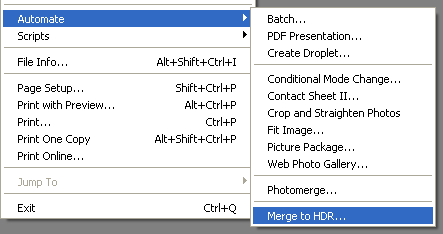
This will open a dialogue box which looks similar to:
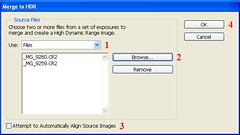
1 & 2. "Use" files allows you to browse for the RAW files you want to use. "Folder" looks for a folder (surprise!) with RAW files to merge. "Open Files" uses the RAW files already opened in CS2.
3. I only use "Automatically Align" when merging handheld images. Aligning the images takes significantly longer than merging without alignment.
4. OK! Which will bring up this window:
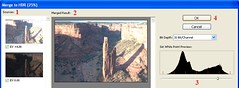
I used a smaller zoom and cropped out some of the dead space to make the image a more manageable size. Visible here are:
1. The source images. Prep work in Adobe Bridge: I ensure that the temperature and tint values for all the to-be-merged images are the same. I uncheck all the auto-correction boxes. I never use Bridge's sharpening algorithm. Now, you will notice that PSCS2 made the darker image 0 EV and the lighter image +4 EV. You will notice, however, that one is overexposed, and one is underexposed. For whatever reason, Photoshop will always put the darker image of a pair at 0 EV. It does not do this for three exposures.
2. Preview of the 32-bit merge of the 16-bit originals.
3. Gamma-adjustable histogram. CS2 does a very good job of picking a proper gamma. If you desire to change it, you may. In fact, I encourage that you play around with it just to see what happens. If you want to reset it, just press the ALT key (PC) and press the Cancel/Reset button.
4. Whee! Next, convert the image to a modifiable 16-bit image:
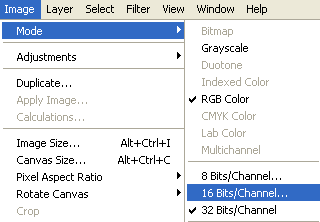
Image > Mode > 16 Bits/Channel.
This is where the magic happens. Getting this part right will go a long way towards making your image shine. If you made mild mistakes earlier in the process, they can be partially recouped in this step. But, like photography, starting with a better image will make processing easier and the end results more stunning.

1. Method. The algorithm by which the image will be processed.
a. Exposure and Gamma: This will allow you to adjust the brightness and perceived contrast.
b. Highlight Compression: This is a one-click algorithm which compressed the highlights into a 16-bit range (or 8-bit).
c. Equalize Histogram: Equalize histogram compresses the highlights and shadows while preserving contrast--the quickest and easiest way to create realistic high dynamic range images. I am using it in this example for ease.
d. Local Adaptation: My favorite. Manually adjust the tonal range of the HDR image via a curves-like algorithm over the image's histogram. Also has threshold and radius adjustments.
2. Toning Curve & Histogram is only usable in Local Adaptation. I keep it open, because I typically use Local Adaptation, and I like to see what sort of information I am dealing with.
3. Zing!
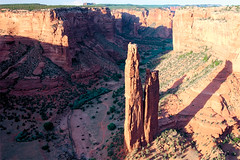
Somewhere between processing and making screenshots I lost the original processing of my single exposure, so I had to reprocess it. I'm not quite as happy with these results, but they get the point across.
Single-exposure:
HDR composite:
Conclusions
Mastery of Photoshop is not required. First and foremost, master your camera. Understand that exposing correctly is important. Expose such that your 0 EV exposure is exposed right, then include the highlights and shadows (±2 EV, typically).
The second thing to keep in mind is self control. Often time the difference between a great HDR and a flop is too much: Too much saturation. Too much contrast. Too many highlights or shadows. Don't work hard to save detail in the extremes, only to erase it again with heavy-handed curves or shadow/highlight adjustments.
Understanding that HDR does not save failed images. A failure is a failure. Period. It is harsh, but it is also reality. Additionally, HDR, when used improperly, can ruin successful images. It happens all the time.
Finally, it is possible to create rather spectacular HDR images that look like a single exposure.
Leviathor's Photostream
Leviathor's Group
Magic Donkey Group
PS. If wanting to duplicate or reproduce any part of this, please contact me (through Flickr, preferably). I consider this a body work, much like the photographs before you.
posted by Leviathor @ 9:14 AM
0 comments
![]()
![]()

0 Comments:
Post a Comment
<< Home